Showing posts with label acrylic. Show all posts

November 14, 2011

Cut Your Stamps? Are you Crazy?


One question I get from my customers is, “I’ve heard you can cut acrylic stamps. Is it really okay to cut my stamps?”  The answer is YES!! I know it’s scary to do but it opens up a world of possibilities with your stamps!

First of all, why would you want to cut your stamps? Well perhaps you have a saying that is long and narrow but you want the words to be stacked on top of each other to fit a square space. Or perhaps you only want to use part of a stamp.


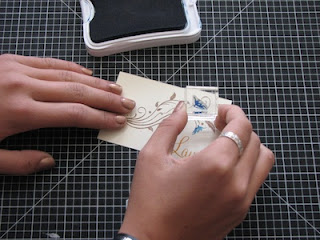
When I created this card the other day, I had a vine stamp and I wanted to stamp this cute flower onto the vine without the stem and leaves. Yet, the way the stamp was designed it was difficult to ink up just part of the stamp. The answer? Cut the bloom!


I just took the stamp off the carrier sheet and decided where to cut. When cutting a stamp, I like to make sure that there is enough blank space around the image to make it easy to cut the image without cutting any other parts of the design. As you get more confidence in cutting stamps you can get more daring. J When you have planned your cut, simply use your microtip scissors and cut your stamp.


Now you have your stamp in two pieces. It’s easy to put both pieces together on a block to stamp the whole thing as one image in the future. So you don’t have to worry about not being able to use the whole stamp together as one piece another time. You have the best of both worlds!


Now just stamp your image.


And voila! Your final card! See the cute blue blooms on the vine. I couldn’t have done it easily without cutting that stamp. 


See! It’s super easy to cut your stamps and have flexibility with your images. Enjoy!

Supplies:
·      Dreamin’ paper packet
·      D1482 Love Life stamp set
·      D1436 The Present stamp set
·      Art Philosophy Seasons stamp set
·      Chocolate, Goldrush and Pacifica ink pads
·      Bronze Glitz Gel
·      Basic button collection

June 2, 2011

Beautiful Badge Buttons

I love our canvas badge buttons! They are adhesive backed making them easy to attach. Plus, you can stamp on them, sponge ink of them, and create cool objects with them! On this Mayberry card, I used a canvas badge button to create an apple! Here’s how:

Supplies:

Mayberry paper packet

Mayberry Workshop on the Go stamp set

Olive and Smoothie ink pads

Chocolate waxy flax

Directions:

Ink a stamp that is larger than the badge button with Smoothie ink (or use olive ink if you want a green apple!). The stamp can have any pattern desired. I used the pear stamp included in the set because I loved the pattern on it! Now stamp on the button, rolling down around the edges (the edges are curved on the button so if you don’t roll down around the edge you accidentally only stamp on the center of the button). Now take a sponge and add some extra sponged ink around the edges to make them look darker and more dimensional. To complete the apple, stamp some leaves and cut out. To make the stem, take 4 shorts pieces of chocolate waxy flax and twist them together. Attach onto the card with a glue dot. Just peel off the adhesive paper-backing and attach! It’s that easy!

October 25, 2008

Card Organizer


Where do you store all of your card projects? I am always looking for different ways to store my cards…shoe boxes, drawers…anything! Then I found the idea of using Close to My Heart’s acrylics storage boxes. They are perfect! Here is a fun one I made using the Notebook paper. It was so easy! Here’s how:

1. 1. Attach 2” wide strips of pattern paper around the box with strong adhesive, starting from the back.
2. Stamp the word “CARDS” to the saying piece. Add brads and ribbon and attach in the front, covering the ends of the strips. Add a flower and a button to the front.
3. Tie ribbon to the handle as desired. You’re done!