Holiday gift tags? Check! I love making holiday gift tags to dress up my presents and packages. And they are so easy to do. Watch this little video and you'll see just how easy they are!

December 5, 2011
November 14, 2011
Cut Your Stamps? Are you Crazy?
One question I get from my customers is, “I’ve heard you can
cut acrylic stamps. Is it really okay to cut my stamps?” The answer is YES!! I know it’s scary
to do but it opens up a world of possibilities with your stamps!
First of all, why would you want to cut your stamps? Well
perhaps you have a saying that is long and narrow but you want the words to be
stacked on top of each other to fit a square space. Or perhaps you only want to
use part of a stamp.

When I created this card the other day, I had a vine stamp
and I wanted to stamp this cute flower onto the vine without the stem and
leaves. Yet, the way the stamp was designed it was difficult to ink up just
part of the stamp. The answer? Cut the bloom!

I just took the stamp off the carrier sheet and decided
where to cut. When cutting a stamp, I like to make sure that there is enough
blank space around the image to make it easy to cut the image without cutting
any other parts of the design. As you get more confidence in cutting stamps you
can get more daring. J
When you have planned your cut, simply use your microtip scissors and cut your
stamp.

Now you have your stamp in two pieces. It’s easy to put both
pieces together on a block to stamp the whole thing as one image in the future.
So you don’t have to worry about not being able to use the whole stamp together
as one piece another time. You have the best of both worlds!
Now just stamp your image.

And voila! Your final card! See the cute blue blooms on the
vine. I couldn’t have done it easily without cutting that stamp.

See! It’s super easy to cut your stamps and have flexibility
with your images. Enjoy!
·
Dreamin’ paper packet
·
D1482 Love Life stamp set
·
D1436 The Present stamp set
·
Art Philosophy Seasons stamp set
·
Chocolate, Goldrush and Pacifica ink pads
·
Bronze Glitz Gel
·
Basic button collection

November 9, 2011
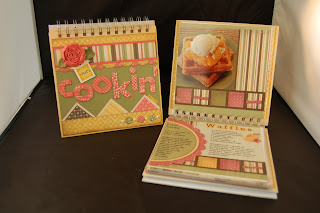
Studio J....Not Just for Scrapbooking!
Do you think that Studio J is only for
scrapbooking? Think again! Here is an example of a recipe book
that was made using Studio J. You
can take your JPG’s and have them printed any size that you want. In this example, they were printed in
6” X 6” size so that they would fit into a My Creations Display Album. You could make a book with a collection
of favorite Christmas recipes, family favorites, soups, etc. Make each recipe and take a photo of
the finished product and include it with the recipe for a gift that is sure to
be cherished.

November 3, 2011
Cherish the Day!
So I have a secret to tell you! I LOVE the November Stamp of the Month! :) It is a delightful set filled with images for each month of the year. Check out some great artwork ideas, created by my friend Sandy.


And she made it all without using a single pair of scissors! She used the Cricuit Art Philosophy
Cartridge to cut out all of the tags, pop up boxes, tickets and even the cute
fry box! She said it was so fast and easy it left her more time to stamp and
create beautiful works of art.

The Fry Box makes the perfect Studio J gift
card holder, or any other gift card (Don't have a Studio J gift card? Give me a call and we can take
care of that). It is the perfect gift for everyone on your Christmas List!


The best part of the Stamp Of The Month set is you
can get it for as little as $5.00. Get ready to create all of your
holiday gifts Faster, Simpler and Easier!
October 21, 2011
Name that Paper!!
Can you name the paper packet used in this Studio J
layout?

Stumped? It’s Michief!
That’s right…a Halloween themed paper! Would you have ever dreamed of using
Halloween paper on a Homecoming layout? That’s one of the benefits of Studio
J. You can play with paper
combinations that you wouldn’t normally try! On this Homecoming layout, I
simply chose any paper kit mix I wanted. Then I swapped the papers for two of
the more traditional papers in the kit. Added some accents that matched the
colors in the picture and voila! A surprise layout that does not look
“Halloween” at all. So the next time you hop on Studio J, play around with
swapping papers and the different looks and combinations that you can get!
October 19, 2011
Making Great Black and White Photos
Halloween is almost
here and you’ll be taking those traditional photos of your ghosts, goblins and
fairy princesses. A fun way to capture some Halloween spirit is to turn some of
your color pictures into black and white.
It is very easy to do using Studio J, just drag and drop your photo into
a layout, click on the Filter drop down and you can change it to Black and
White or Sepia. Using these filters is a perfect match with the new Mischief
paper. Don’t be scared – give it a try!
Here are 5 Tips for
your Black and White Photos to come out looking sharp.
Shape and Form - When looking for a good shot, look beyond the
colors in a scene and instead focus you attention on the shapes. Try to create
an interesting composition.
Contrast - Without differences in color to separate elements
in your shot, you must instead introduce contrasting shades. Use contrast to
help your main subject stand out – such as a light subject against a dark
background.
Pattern - Black and white photography gives you a much
better chance of capturing interesting patterns because it focuses the viewer's
attention on the shapes formed by the elements in a scene.
Texture - In the same way that patterns can be lost in
color photography, textures can be too. With black and white photos, the mind
no longer has that color information to work with, so it pays more attention
and focuses on the elements such as texture and pattern.
Lighting - Lighting is absolutely key to a good black and
white photograph because it affects all of the above elements - shape, contrast,
pattern and texture.
Side lighting often
produces the most dramatic black and white photos. It picks out the edges of
shapes and increases contrast by adding highlights, and the shadows it creates
add interest to the scene as well as enhancing textures and patterns.
Online reference: http://www.photographymad.com/pages/view/5-essential-tips-for-black-and-white-photography


October 5, 2011
Sleigh Card

October 3, 2011
Simple and Sweet

It's that time! Christmas will be upon us before we know it.
Wouldn't it be nice to have all our Christmas cards ready before
December? This months SOTM is a step in the right
direction. When you purchase $50 in product, you can also purchase this
cute set for just $5! Then you can enjoy creating sweet and simple projects to make your holiday season festive! Watch for more cute and easy projects using this adorable stamp set each day this week! You will be inspired by simple and sweet holiday creations that you can create in a snap!
 By the way, aren't these children in this above layout adorable? They are my nieces and nephew! So stinkin' cute! They were thrilled to be featured in the Close to My Heart Idea book! My nephew even said, "I'm famous now!" I love it. What a cutie.
 September 28, 2011
Raid Your Stash for a Little Extra Bling!
I had so much fun creating some new Studio J layouts the other day. Yesterday they arrived in the mail and I eagerly ripped open the box! :) As I looked at them I noticed on my table was sitting some left over bling from another project I had just finished (imagine that! I'm actually finishing projects! ha! ha!). So I decided to add some of that extra bling to my layouts. Sooooo awesome! I love the look! I had so much fun in fact that I did another one! The pictures really don't do it justice, but here are some picts anyway:


All I did was raid my stash for a little extra bling and voila! So much fun!

Before

After with a little extra bling

Before

After with a little extra bling
All I did was raid my stash for a little extra bling and voila! So much fun!
September 22, 2011
Gift Card Holder Tutorial
 It seems like I am always
in need of a gift for a wedding, and gift cards are a quick pick, but can be
rather impersonal. Why not make it
extra special by enclosing it in this beautiful gift card holder? It features our brand-new Roxie paper
and accessories, and is super easy to put together.
It seems like I am always
in need of a gift for a wedding, and gift cards are a quick pick, but can be
rather impersonal. Why not make it
extra special by enclosing it in this beautiful gift card holder? It features our brand-new Roxie paper
and accessories, and is super easy to put together. Supplies
All papers, stamps and
embellishments are available in the Roxie Workshop on the Go Kit—G1025, pg. 25,
$29.95
Stamp Pads
Z2105 Black
Z2166 Tulip
Z2118 Desert Sand
Miscellaneous
18” ribbon
Adhesive, such as Tombow
1772 Glue Dots
Z1151 3-D Mounting Tape
2 pins from Z1466 Bling
Assortment (pg. 128--$4.95 or included in Workshop on the Go Kit)
Z697 Sponge
Cutting Dimensions
Black Cardstock
 1 ¾” x 2 ¾” (tag)
4 ¼” x 11” (base)
Score along long edge at
3”, 5 ½” & 8”
Roxie Background and Texture Paper
Four-4” x 3 ¾” (use plaid
side on two and pink side on other two)
½” x 4” pink rose pattern
paper
Colonial White Cardstock
1 ½” x 2 ½” (tag)
Scrap for stamping
Desert Sand Cardstock
4” x ¾”
Assembly Instructions:
Cut papers as listed
above.
 · On a scrap of Colonial White Cardstock, stamp one
large rose in Tulip Ink, and the small rose in Tulip, and then without
re-inking, stamp it again so that you have a second-generation rose—it will be
slightly lighter in color and will give you a nice variation in color.
· On a scrap of Colonial White Cardstock, stamp one
large rose in Tulip Ink, and the small rose in Tulip, and then without
re-inking, stamp it again so that you have a second-generation rose—it will be
slightly lighter in color and will give you a nice variation in color.
· Stamp the filigree border stamp in Black on the pink
½” x 4” strip.
· On the 1 ½” x 2 ½” Colonial White piece, stamp “Love”
in Tulip Ink in the bottom right-hand corner. Stamp “So in” in Black Ink in the upper left-hand
corner. Sponge edges of tag with
Tulip Ink.
· Stamp two large leaves side by side, slightly
overlapping, in Desert Sand. Score
the 4 ¼”x11” base at 3”, 5 ½” & 8”.
Fold on score lines to make an “M” shape.
 Next, you need to cut the
opening for the gift card. Find a
round
Next, you need to cut the
opening for the gift card. Find a
round
object that is approximately 4” in diameter to use as a guide—I used
a
small tin. Fold the base piece in
half and trace the edge of your
round object along the fold. Make sure that you are leaving at least
3/8” along both sides. Trim with scissors.

Next, you will need to adhere the gift card pocket
together. Place a strip of
adhesive along both sides and the bottom edge of the pocket, as illustrated
with the white strips below. You
can use an adhesive, such as Tombow, but may want to add some gldots at the
corners for a stronger bond.
Fold the base in half and
you will have a nice pocket for the gift card.
 Next, you need to add the ribbon. Mark the center of your length of ribbon
and wrap it around the holder—make sure that you have the fold at the bottom. Adhere in several places with glue dots.
Next, you need to add the ribbon. Mark the center of your length of ribbon
and wrap it around the holder—make sure that you have the fold at the bottom. Adhere in several places with glue dots.
 Now you are ready to add
the beautiful papers. Distress the
edges of the pink rose-print papers with black ink and adhere to the inside of
the holder.
Now you are ready to add
the beautiful papers. Distress the
edges of the pink rose-print papers with black ink and adhere to the inside of
the holder.
· Distress the edges of the plaid papers and adhere to
the front and back covers of the holder.
· Using the edge of your scissors, scrape the edges of
the black tag base and the Desert Sand strip for a nice distressed edge, and
then layer with corresponding stamped pieces.
· Adhere the Desert Sand Strip on the front cover,
approximately ¼” from bottom edge of plaid paper.
 · Adhere the “So in Love” piece to the using 3-D
Mounting Tape.
· Adhere the “So in Love” piece to the using 3-D
Mounting Tape.
· Add the two pins, inserting them through the 3-D
mounting tape that you used to adherthe smaller rose.
· Add
gift card and your hand-written greetings to the inside and you have a lovely
gift for the bride and groom!


September 19, 2011
Cutting with No Scissors

September 15, 2011
Art Philosophy..Cricut style!
The Art Philosophy Cricut Cartridge is here!
 Close To My Heart has taken paper crafting to a new creative level. Not only did they come out with an exclusive cartridge with 700 images, they have bundled it with three coordinating D-size stamp sets as well as three sheets of chipboard shapes for a terrific price of only $99. It all works together perfectly!
You may be wondering if this cartridge matches up to other stamp sets? The answer is YES! There are other stamp sets throughout our Idea Book that are indicated with a thin red line. These stamp sets also match up with images on the Art Philosophy Cricut Cartridge. Awesome! How do you know what shape and size to cut out for each stamp? The stamps sets do include the measurements right on the packaging - the stamp’s carrier sheet - so you will know exactly what size to die cut your image with your Cricut so that you can then stamp your image perfectly onto your die cut. And to make it even easier, purchase the Art Philosophy package and I will send you three quick reference temps to help you know exactly what shape to use. Just slip them into your stamp set case and with a quick glance you have the cricut setting info for each stamp. Perfect!

September 12, 2011
Photo Tips that will Light Up your Photos!
Have you ever seen professional photographers use those cool light reflectors in their photo shoots? Wow! They can make a huge difference in your photos! Whether you are staying inside or you are out enjoying the sunshine, the use of a light reflector can make a good photo great. But guess what...they aren't just for professionals! Here are a few simple tips on making and using a light
reflector in your photography.
Here are a few images to compare.
The first image was taken without a reflector, casting harsh
shadows on the face.

In the second shot, my friend Sandy positioned a reflector in front of her daughter (towards the incoming light), bouncing the light and brightening the
face. Doesn't that make a huge difference?

Create Your Own Reflector
Light reflectors are available to purchase at local
photography stores. Or you can make your own in a few simple steps using foil
and cardboard.
Here’s how:
1. Cut cardboard piece to desired size and score in thirds.

2. Wrap foil around cardboard, and smooth out wrinkles.

3. Secure foil in place using tape.

4. Use the finished reflector to bounce light

Additional Reflector Options
There are other tricks to the trade when it comes to
bouncing and reflecting light.
Here are a few ideas to try:
Wear White: Reflecting light can be as simple as throwing on
a white shirt. Light bounces off
of white and will naturally reflect on your subject it you aren’t a great
distance away.
Use White Foam Board: Foam core boards are available at
local craft stores and are a great reflector option. Plus, they are lightweight
and inexpensive, making them a nice photo-equipment option
Subscribe to:
Posts (Atom)